It's a while since I provided you with a tour of the line showing how all the bits fit together. In this virtual tour we shall follow the Down Afternoon Mixed Train as it traverses the line from Beeston Market to Bickerton.
 This plan hopefully shows how everything fits together and how it has evolved over the past five years from the original looped figure of eight (see the first blog posting) to today's representation of the hypothetical railway (see A tour of the hypothetical line).
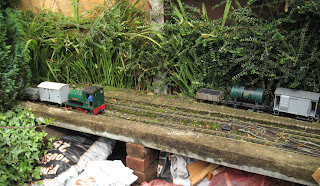
The Down Afternoon mixed is waiting on the main platform at Beeston Market (see A typical running session). On the right are the goods sidings and in the foreground the sidings which will serve the engine shed. On the extreme left is the siding which leads to the interchange siding with the Chester to Crewe mainline railway.
 This photo taken from the other end of the station shows more clearly how the sidings and platform are arranged. As you can see, there is still much work to be done ballasting the track (see Adding more sidings to Beeston Market), adding more detail, constructing the engine shed and adding buffer-stops to the sidings.
 The train has departed and is approaching the copper mine. The hidden link from Beeston Market to the Copper Mine is seen on the right. This allows the train of full tippler wagons to be exchanged for empties, giving the impression that the tipplers have discharged their loads (see A typical running session).
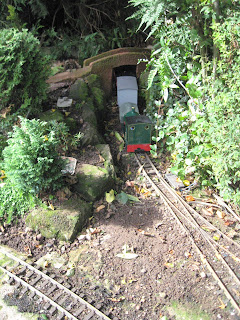
 Moving on a little further, the train of full ore wagons has just arrived at the copper mine. The diesel will leave these and pick up the train of empties. In 'reality', the copper mine is not situated here (just outside Beeston Market). It has been placed here for convenience. Still much work to be done here. The mine buildings (to be modelled in relief - ie just frontages) will be constructed and placed on the right and loading hoppers will be placed over the hidden link track.
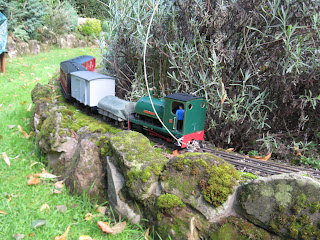
 A little futher on and the train negotiates a couple of rather severe reverse curves (LGB R1). Eventually I would like to replace these and all the R1 points with alternatives. But this will have to be postponed until funds and time permits. On the lawn is one of the stock boxes used to transfer and store the rolling stock between running sessions (see How I made some stock boxes).
 The line then curves towards the fence, past the compost bin lurking behind the fig tree on the left.
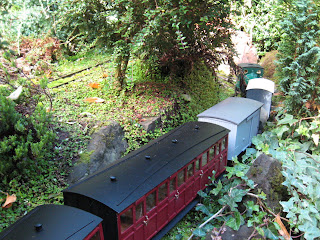
 The track then runs parallel to the fence behind a line of leylandii. I have thinned these out a little to allow better access and to give the impression that the trains are passing through woodland.
 On emerging from behind the hedge, the train crosses the junction which leads towards Bulkeley Station. Again, this is another exercise of "modellers' licence" as this junction would not exist in 'reality'.
 The line then disappears behind the sheds. The blue plastic on the right covers a stack of timber - I tend to accumulate off-cuts - just in case!

 Then parallel to the fence behind the sheds. Once more, those two window frames have been stored there for at least ten years - you never know!!
 The train passes over the copper mine branch link (more modellers' licence) (see Progress Report 24) ........
 ......before emerging from behind the sheds, passing under a conveniently placed road bridge (see How I cast road bridges in concrete).
 The train then runs beneath the hedge at the back of the garden rising up a slight gradient.......
 ....passing behind some heather and a conifer................
 .........to emerge into Beeston Castle Station (see How I assembled the station buildings).
 The cast concrete platform (see How I cast curved platforms in concrete) needs to be adjusted slightly here as some of the stock catches on it. Beeston Castle is on the hill on the right (see Progress Report 15). At present, it is a rather ruined representation - eventually a more realistic segment of the castle will be modelled. The rather unscale drunken lampost is a temporary measure. This will be replaced with something more in keeping when the station becomes more detailed.


 ...........before passing the stream (supposedly the River Gowy).
 The line then crosses the stream which becomes more of a river as another feed from the pump joins it (see How I made the stream).
 After crossing the river, the line takes another right turn......
 ...... and then a sweeping left turn.
 Before reaching Peckforton Station. From Beeston to Peckforton, the line descends on a 1 in 40 gradient (see How I laid the track).
 The train waits at the station platform.....

 ..... while the loco shunts whichever wagons have been identified for movement by the computerised freight management program which I have devised (see Progress Report 16).
 The train then departs Peckforton across the viaduct which can be swung aside to allow access to the patio (see Bridging the gaps and Laying the patio). This viaduct was very much an experiment. Constructed from plywood it was plastered with exterior Polyfilla and some left-over tile adhesive when I revamped the bathroom. It has not been entirely successful as some of the cladding has fallen off and some remains. Another job on the todo list.
 The line then runs alongside the river again........

 .... as it threads its way .......
 ....... along the sandstone clad wall of a raised bed (see How I made the raised beds)

 ....... passing on the way, the junction to Bickerton Station (again modellers' licence).........
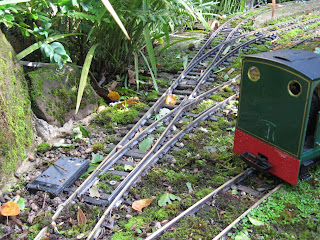 ...... before emerging to start the climb (1 in 40)..........
 ..... beneath Beeston Castle Station ................
 ..... winding around the foliage .................
 ...... past the 'cat controller' .....................

 ............. before taking the reverse loop link ............


 ...........across the swing bridge. In 'reality' there is no need for a swing bridge on the Peckforton Railway but I had to find a way of taking the railway across the front of the sheds, leaving sufficient access for the trailer tent. The swing bridge is constructed from uPVC trim and based on the original swing bridge on the Southwold Railway before it was replaced (see How I constructed the swing bridge).
 Immediately following the swing bridge, the train reaches Bulkeley Station. Once more, there is a need for some detailing here. The station building, just behind the loco, was converted from a children's toy bought on eBay for £5.50 (see How I converted a toy into a station building).
 After a brief stop, the train continues past the siding and loading bay (see How I cast loading docks in concrete) ................
 .......... and passes the branch line to the Copper Mine. If you look at the plan you can see how this branch enables the ore trains to and from the copper mine to appear to join the main railway at the appropriate point (ie between Bulkeley and Bickerton) albeit on the wrong side.
 The line then continues past the cottage on the hill (see Progress Report 27) between the two road bridges before encountering the link for the reverse loop once more.................
 ......... and descending back towards Bickerton.
 Passing under the flyover bridge, the train takes the junction................
 ........ to roll into Bickerton Station.


As you can see, there is still much to do on the railway. A lot more detailing is needed on the stations and some of the foliage is beginning to outgrow its original purpose. However, the line is functional and I can run services much as I assume they would have been run if the line had existed.

The Down Afternoon mixed is waiting on the main platform at Beeston Market (see A typical running session). On the right are the goods sidings and in the foreground the sidings which will serve the engine shed. On the extreme left is the siding which leads to the interchange siding with the Chester to Crewe mainline railway.


An acute right turn, where the line shifts from being mounted on timber to breeze-block foundations. To this point the line has been level, but the ground rises towards the back of the garden. (see Extending the line and How I laid the track).


The train crosses the reverse loop link (modellers' licence again).......................


On leaving Beeston Castle Station, the line crosses over itself (see How I skewed an LGB truss bridge) ............

......taking a sweeping right turn..................


Peckforton Station is actually on a gradient. It would have been better for the station to have been constructed on the level, but this would have steepened the gradient to Beeston Castle (see Progress Report 17).


.... back towards the flyover bridge ...............


to pass (in the opposite direction) once more beneath the road bridge and disappearing behind the sheds.

The train emerges from behind the sheds to take line leading towards Bulkeley Station....................


Bickerton Station is built on two paving slabs which have been mounted on brick piers providing a store underneath for fuel for the multifuel stove. The line actually continues, through a hole in the wall on into the lean to (see Progress Report 2). The sidings in the lean to are used to store any trains which are 'in transit' at the end of a running session. They can be quickly rolled out to resume play at the start of the next running session. During the winter, however, the stock is stored in the storage boxes in the leanto (with the locos stored in the house).

As you can see, there is still much to do on the railway. A lot more detailing is needed on the stations and some of the foliage is beginning to outgrow its original purpose. However, the line is functional and I can run services much as I assume they would have been run if the line had existed.
No comments:
Post a Comment