As mentioned in Progress Report 31, I was able to purchase a Hunslet kit from Garden Railway Specialists with money which was raised by my colleagues as a semi-retirement present. I have long coveted this kit and many moons ago I was fortunate enough to purchase an LGB OHO loco (similar to Otto) for a very competitive price on eBay.
Disassembling OHO

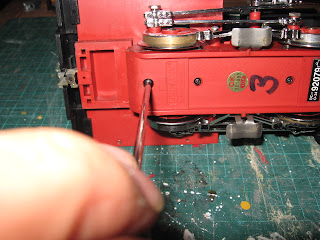
My first task was to strip down OHO to reveal its chassis. Fortunately, LGB locos are usually held together with screws. Firstly, the screws holding the steps were removed:

........followed by the two screws under the front of the cab.......

..... and the two screws at the rear of the cab.

At the same time I also removed the couplings. Although these do not hold the parts of the loco together, I prefer to strip loco chassis down as much as I can.


The cab, simply lifts off the chassis.

Next, the boiler was tackled. The two large screws beneath the loco were removed........
.....followed by the two beside the cylinders.

This released the boiler, firebox and smokebox assembly, together with the lead weight. The chassis was now revealed in all its glory.

Constructing the kit
For me, the first stage of construction was the footplate. The GRS instructions are somewhat vague over the way in which the stepped footplate actually goes together and, in fact, I took three goes at it before I figured out what worked. The first step (in my final approach) was to glue the spacer across the front of the cab footplate - the piece across the gap in the middle was later removed to accommodate the LGB chassis.

The sides and the buffer beam were then attached to the front section of the footplate. (The buffer beam was later removed as I decided to reshape it and also to fit it around the coupling hook).

The two halves were then glued together and the sides added to the rear cab section. The whole thing was fitted over the chassis to check for clearances.

To allow the footplate to fit snugly, the cylinders were removed (two screws) and the mountings for these were cut down using a razor saw.

As it turned out, I cut them down a little too enthusiastically and had to build them back up again with three laters of plasticard. If I was to do this again, I would be more measured in cutting down the cylinder mountings (ahh.... the benefit of hindsight!!).

At the same time I removed (with a razor saw) the mountings for the valve mechanisms from the ends of each slider.

Next, came the interesting bit. I test fitted the cab to the footplate and removed a small cut-out from the front of the cab to allow it to fit over the chassis.

The boiler/saddle tank sections were superglued together (after some filing and sanding to remove the moulding blips).


The smokebox was then attached.

The superstructure was then test fitted on the footplate to check for clearances.......
..... and small cut-outs were removed from the rear of the smokebox and the front of the firebox to fit over the chassis.

Next, the whitemetal details were cleaned up with a file and glued into place with superglue. Again, the instructions are not too clear but hopefully most of the parts are more or less on the right place - though I think the firebox door is hung on the wrong side (ie it's upside down).

Similarly, the chimney, safety valves and whistle were added to the boiler and smokebox.At the same time, some filler was applied to fill some dints in the casting.

Having learned from previous experience (see How I made a GRS Peckett loco kit), that retro-fitting decoders is a pain in the proverbial, I drilled and filed out the back of the boiler........

.....to take a Massoth L (identical to an LGB) decoder....

Similarly, I decided it was time to work out where the weights would go. I cut OHO's weight into two segments (with a hacksaw and much grunting)...........

...... and positioned the larger chunk on a piece of plasticard inside the saddle tank (above the decoder) ........

....... and glued (with epoxy) the smaller chunk inside the firebox, leaving room beneath for access to the decoder when the whole lot is finally glued together. The larger chunk was expoxied to the sheet of plasticard.

To ensure that the handrails would be level, I carefully drew a line along the sides of the saddle tank by balancing a ruler atop another and drew a line.....

....then measured 10mm above this and drew another line. Two 2.2mm holes for the handrail knobs were drilled 10mm in from each end of the tanks.

...and the handrail knobs were then superglued in place, with a length of handrail loosely fitted to ensure they would line up.

Similarly, the handrails for the cab were fitted, 5mm in from the doorway.

The whitemetal fittings (sandboxes, springs and buffers) were glued to the footplate. The buffer beams having been shaped and glued in over the couplings.

Incidentally, the front coupling needed to be moved forward 12mm to protrude sufficiently. It was simply screwed into the mounting further forward.

The various parts of the loco were now effectively finished and ready for painting.
Painting and finishing
Painting is my least favourite part of the modelling process - to my mind, it offers the greatest potential for error and maybe even disaster. With this loco, I decided that I would paint the various parts separately before fitting them together. The interior of the cab needed to be painted first anyway as this would have been impossible once the model was completed.
Two coats of grey primer followed by two coats of matt black were applied to the firebox and can interior, using Halfords' rattle can aerosols.

At the same time, I completely stripped down the chassis and gave that the same treatment. I did not want a red chassis.

The chassis was reassembled and the wheels painted with black acrylic and the motion picked out in red acrylic.

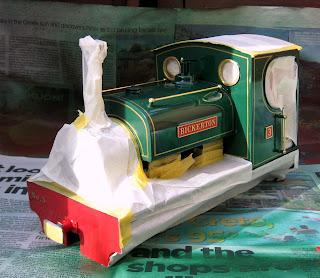
Everything was given a couple of coats of grey primer and then the cab and saddle tank were sprayed with Humbrol acrylic Brunswick Green and the footplate bruch painted matt black (acrylic) and the cab roof and smokebox sprayed with satin black (acrylic). The inside of the cab was painted cream and the buffer beams painted with Humbrol red enamels.

Once the paint had hardened off, lining was applied using Trimline lining tape (see How I lined my locos with Trimline tape).

Name and number plates were glued on with Superglue

and waterslide transfers were applied to the buffer beams.

The black areas were masked off and the everywhere else given a couple of coats of acrylic varnish to seal the lining and the transfers
A few minor details were added (eg a driver) or touched up (eg the buffers) and then the body was mated with the chassis.

Disassembling OHO

My first task was to strip down OHO to reveal its chassis. Fortunately, LGB locos are usually held together with screws. Firstly, the screws holding the steps were removed:

........followed by the two screws under the front of the cab.......

..... and the two screws at the rear of the cab.

At the same time I also removed the couplings. Although these do not hold the parts of the loco together, I prefer to strip loco chassis down as much as I can.


The cab, simply lifts off the chassis.

Next, the boiler was tackled. The two large screws beneath the loco were removed........

.....followed by the two beside the cylinders.

This released the boiler, firebox and smokebox assembly, together with the lead weight. The chassis was now revealed in all its glory.

Constructing the kit
For me, the first stage of construction was the footplate. The GRS instructions are somewhat vague over the way in which the stepped footplate actually goes together and, in fact, I took three goes at it before I figured out what worked. The first step (in my final approach) was to glue the spacer across the front of the cab footplate - the piece across the gap in the middle was later removed to accommodate the LGB chassis.

The sides and the buffer beam were then attached to the front section of the footplate. (The buffer beam was later removed as I decided to reshape it and also to fit it around the coupling hook).

The two halves were then glued together and the sides added to the rear cab section. The whole thing was fitted over the chassis to check for clearances.

To allow the footplate to fit snugly, the cylinders were removed (two screws) and the mountings for these were cut down using a razor saw.

As it turned out, I cut them down a little too enthusiastically and had to build them back up again with three laters of plasticard. If I was to do this again, I would be more measured in cutting down the cylinder mountings (ahh.... the benefit of hindsight!!).

At the same time I removed (with a razor saw) the mountings for the valve mechanisms from the ends of each slider.

Next, came the interesting bit. I test fitted the cab to the footplate and removed a small cut-out from the front of the cab to allow it to fit over the chassis.


The smokebox was then attached.

The superstructure was then test fitted on the footplate to check for clearances.......

..... and small cut-outs were removed from the rear of the smokebox and the front of the firebox to fit over the chassis.

Next, the whitemetal details were cleaned up with a file and glued into place with superglue. Again, the instructions are not too clear but hopefully most of the parts are more or less on the right place - though I think the firebox door is hung on the wrong side (ie it's upside down).

Similarly, the chimney, safety valves and whistle were added to the boiler and smokebox.At the same time, some filler was applied to fill some dints in the casting.

Having learned from previous experience (see How I made a GRS Peckett loco kit), that retro-fitting decoders is a pain in the proverbial, I drilled and filed out the back of the boiler........

.....to take a Massoth L (identical to an LGB) decoder....

Similarly, I decided it was time to work out where the weights would go. I cut OHO's weight into two segments (with a hacksaw and much grunting)...........

...... and positioned the larger chunk on a piece of plasticard inside the saddle tank (above the decoder) ........

....... and glued (with epoxy) the smaller chunk inside the firebox, leaving room beneath for access to the decoder when the whole lot is finally glued together. The larger chunk was expoxied to the sheet of plasticard.

To ensure that the handrails would be level, I carefully drew a line along the sides of the saddle tank by balancing a ruler atop another and drew a line.....

....then measured 10mm above this and drew another line. Two 2.2mm holes for the handrail knobs were drilled 10mm in from each end of the tanks.

...and the handrail knobs were then superglued in place, with a length of handrail loosely fitted to ensure they would line up.

Similarly, the handrails for the cab were fitted, 5mm in from the doorway.

The whitemetal fittings (sandboxes, springs and buffers) were glued to the footplate. The buffer beams having been shaped and glued in over the couplings.

Incidentally, the front coupling needed to be moved forward 12mm to protrude sufficiently. It was simply screwed into the mounting further forward.

The various parts of the loco were now effectively finished and ready for painting.
Painting and finishing
Painting is my least favourite part of the modelling process - to my mind, it offers the greatest potential for error and maybe even disaster. With this loco, I decided that I would paint the various parts separately before fitting them together. The interior of the cab needed to be painted first anyway as this would have been impossible once the model was completed.
Two coats of grey primer followed by two coats of matt black were applied to the firebox and can interior, using Halfords' rattle can aerosols.

At the same time, I completely stripped down the chassis and gave that the same treatment. I did not want a red chassis.

The chassis was reassembled and the wheels painted with black acrylic and the motion picked out in red acrylic.


Once the paint had hardened off, lining was applied using Trimline lining tape (see How I lined my locos with Trimline tape).

Name and number plates were glued on with Superglue

and waterslide transfers were applied to the buffer beams.

The black areas were masked off and the everywhere else given a couple of coats of acrylic varnish to seal the lining and the transfers

A few minor details were added (eg a driver) or touched up (eg the buffers) and then the body was mated with the chassis.

A few more details need to be finished off (eg glazing the spectacles, some light weathering), but No. 3 is now ready to join the growing fleet.


