Sunday, August 28, 2011

Planning the railway

For me. planning a layout is just as interesting as building and operating it. As you can see from my personal history of railway modelling, I spend a fair amount of time in the planning phase. In the case of my garden railway, the planning stage lasted around five years.

When I first laid out the garden, thirty years ago, I had half a mind to including a garden railway. Around twenty years later, this dream was realised.

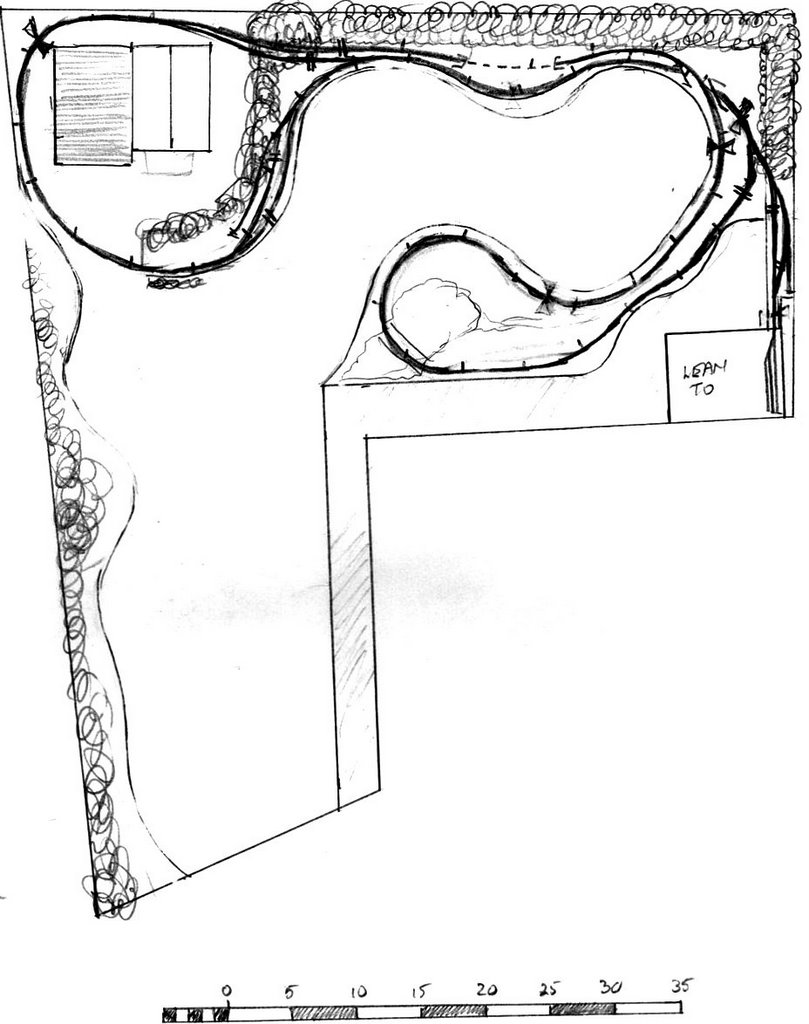
The first few plans I drew were based on the garden design as it then existed.

From the start, I appreciated the importance of planning the railway so it could be built in phases. Firstly, this would allow me to spread the cost of construction over a more prolonged period and secondly, I felt it would help to maintain my interest over the years.


In the meantime, I continued researching - viewing video material and reading magazine articles and browsing websites for ideas and inspiration (see Where did I get my ideas from). I came to realise that, to maximise the potential of the garden and gain the most from the model, it would be better to redesign the garden. One particular video of a railway had the greatest impact on my thinking - it was Railways in the Garden vol 3 by Tony Morris. The video featured a railway which was built around the perimeter of a garden on raised beds constructed from several tons of rock. In the centre was a sunken lawn. I had already accumulated a good quantity of local red sandstone - some from a rockery which my parents removed from their garden, some which I had dug up from my own garden when landscaping it, and some bought by answering adverts in the local free paper. Metaphorical seeds were sown!

I decided to start from scratch and landscape the garden around the railway, rather than vice versa. I would lower the lawn to create some raised beds around its perimeter. Various ideas were considered:


Eventually, I homed in on a configuration which I felt would make the most of the available space ......


..... and so experimented with various ideas to make the most use of the space.


I toyed with the idea of basing the railway on a real prototype, in this case one of my favourite railways, the Southwold.

Ultimately, I decided on a less complex design which would allow me to build the railway in phases.


 Here's how the railway looks now

Initially, I had no particular prototype location in mind for my railway. However, after a stroll in the local countryside one weekend, I came up with the idea of setting my railway in the hills not far from where I live (see The line gains an identity and The route of the hypothetical line). After all, the red sandstone landscape was very much in keeping with the piles of rock in the garden!

To gain some idea of the growth of the railway over the years, this animation summarises the phases completed so far:


The railway has now been in place for around six years and is becoming bedded into the garden landscape. The present layout allows for a range of approaches to its operation. I can run trains end to end; I can set trains to tail chase around the main circuit or I can run out and back from either terminus. This animated plan with an on-board trip along the line from one end to the other shows how trains run from end to end:


Animated plan with on-board trip along the line

What I enjoy most is freight handling. I find a train of mixed goods far more interesting to watch and operate than passenger trains (see No 1 takes the pickup goods, A typical operating session and/or Computerised freight management).


For now, further development of the railway have stopped while I accumulate or anglicise more goods stock. However, those raised vegetable beds which my wife requested are quite strategically placed ........................

Railway modelling and me

When did I first become interested in railway modelling? That's a difficult one to answer. I suppose my mum and dad must have contributed something to my interest. When my dad was little, he was forced to leave the family home when his older sisters persuaded his mother to walk out on her wife-beating, drunken husband. My dad wanted to take his prized clockwork trainset with him, but was told he had to leave it behind. My mum was from the East End of London and during the thirties spent most summer holidays in Harwich, travelling from Liverpool Street along the former Great Eastern.


 My mum says she used to spend many a happy hour watching the trains in Liverpool Street station while her dad and his brother quenched their thirst in the station bar. It would appear, then, that my interest in railways could be genetic - but that does not really explain why my brother (a mechanical engineer) has only a passing interest in railways and no interest at all in modelling them.

So, what are my earliest recollections of modelling railways?

At the age of five I remember having my own Hornby clockwork trainset. I used to attach the budgie's mirror to the back of the train so it would chase its reflection round the track.


When I was six years old, we shared an old rectory in the depths of rural Norfolk with my uncle, aunt and three cousins. There was no electric lighting - light and cooking being provided by Calor Gas cylinders. It seems my cousins had accumulated loads of Hornby clockwork track, locos and stock. I can remember we used to lay the tracks out along the corridor at one end of the first floor (the servants' quarters, I think) and run trains to each other in different rooms.

 My family moved out of the rectory after a short while and for some time we lived in rented accommodation in various different places around East Anglia. No chance either financially or spatially to engage in railway modelling - and besides, my contribution to the communal trainset had been left behind (history repeating itself?).


When I was nine we eventually bought our own small bungalow in a village near Great Yarmouth - I think it cost somewhere in the region of £1500 - a fortune in those days. I remember my dad coming home with an early Triang Princess Elizabeth train set which he had bought in an auction.


After playing with it for a while, I recall (to my embarrassment now) brutally bashing the coaches into bogie flat trucks and created a garden railway with the tracks rusting in a muddy corner of the back garden. Needless to say, I was not bought any more railway models by my dad. So, I started saving my pocket money and piece by piece I bought sufficient Triang Series 3 track to make one of the plans in their track plans booklet (LR 4).


At the age of eleven, we moved to a village between Colchester and Halstead and for the first time I had a room of my own. For a while I created variations of the Series 3 track plan until I met my first serious railway modeller, a fellow pupil, who introduced me to the Railway Modeller magazine. It was 1965 when I first subscribed, something I continued for the next twenty years. In the meantime, by chance, I discovered the Festiniog Railway on a family camping holiday to Wales and was introduced to the concept of the 'narrow gauge' railway.

Linda and Prince at Tan y Bwlch

My first 'proper' model railway was an 00n3 narrow gauge end-to-end railway with an impossibly steep incline.


And then Eggerbahn appeared on the scene and 009 was born. I constructed two 009 layouts during this phase of my modelling career  - the first was a rabbit warren type of circuit which wound tortuously through a plaster mountain.

 
  Not the best photo, but the only one I have of my early modelling efforts

 It was never entirely successful and so was abandoned in favour of a more prototypical end-to-end narrow gauge railway running along two walls.


Finally, in this phase of my modelling career, I reverted to 00 scale and constructed a simple terminus to fiddle yard.

For a couple of seasons I worked as an operator for 'The World's Finest Model Railway' at Colchester Zoo. For a teenage railway modeller this was the dream job. The railway was 72 feet long and 15 feet wide. Most of the stock was Fleischmann (for reliability) and the model was divided into sections representing different (European) countries - with a 'City of the Future' (with mono rail) at the far end. My duties were not particularly onerous, I spent most of the time wandering around in a white coat, occasionally re-railing stock, replenishing smoke fluid in the burning house or cleaning track. Every so often (it depended on the through-put of customers) I would dim the lights and turn on the 1000 grain of wheat bulbs which illuminated the model.


I then left home to train as a teacher and after qualifying, moved 'oop Norf' to Cheshire. With a new career and rented accommodation, modelling took a back seat for around fifteen years.

Marriage, a baby daughter and a new house (with a loft) and the modelling bug bit again. An ambitious model of Halesworth Station on the East Suffolk mainline was planned and constructed, complete with a representation of the Southwold Railway in 00n3.

 The above was the first plan - which provided plenty of opportunity for modelling the Southwold, but meant that most of the standard gauge would be hidden from view.

 
This second plan improved the views for the standard gauge by including a branch station (based on Aldeburgh), but limited access to the mainline storage loops under the branch terminus and limited the amount of the Southwold to be modelled.

The third and final plan provided more operating potential for the mainline and was adopted, however some of the curves into the storage sidings are somewhat tight.

Halesworth station - the Southwold (with Swiss rolling stock(!)) in the foreground

Halesworth - sand/gravel interchange sidings in the foreground (my model assumes the SR survived into BR days)

This ambitious scheme sits up in the loft still, all the trackwork is in place and some of the landscaping has been completed - but too many compromises were made in trying to cram too much into too small a space. One day I will either complete it properly, remodel it into something more realistic or dismantle it.

Realising the loft layout was too time consuming (and somewhat anti-social), I constructed a simple terminus to fiddle yard standard gauge railway in the spare room.


 This first plan sent the line behind the maltings (modelled in half relief). I then worked on various alternatives for this end of the layout:


Some included a swing bridge, but I decided I was trying to cram too much into the space ( a common problem of mine).


After considering various options, I decided on a plan which would be more workable.


In addition, it would provide me with storage space underneath for my accumulations of model railway magazine articles and general modelling 'stuff'. While building the railway, I made a few more changes, the most significant being to shift the river bridge to the other end of the quay. I called the station Dunwich as it was inspired by Aldebugh (and Snape).

The goods shed, cattle dock and station building, with coal yard in the foreground

The fish quay and timber yard (the mainline runs behind the buildings). The fish warehouse is based on one at Southwold.


The station throat looking towards the quay and the maltings (based on those beside the station in Halesworth)

This layout has worked well for many years and then, around ten years ago I bought an LGB starter set and started making plans for extending my activities into the garden. Initially, these plans attempted to fit a railway into the existing garden (See Planning the railway). This had been laid out by me when we first moved into the house as a new-build in 1981. Gardening had never been something which which I was entirely comfortable, but I've always enjoyed civil engineering - which for me is digging up and transporting barrow loads of earth. It wasn't long before I started drawing up plans which required landscaping the garden (see video - How I built the Peckforton Railway).

I had been much impressed by watching a video showing a garden railway which ran on raised rockery beds around the perimeter of a garden, with a sunken lawn in the middle. Our back garden has a gentle slope from the house up to the fence, so I figured that by re-laying the lawn about a foot below datum level at the rear of the garden would enable me to create raised beds.


Various plans were drawn at several levels of complexity until I came up with one which seemed feasible (See Planning the railway). I recognised that a plan which could be completed in stages, with plenty of potential for future growth, would be more productive in maintaining my interest.


So, there we are. From my earliest dabblings with a clockwork 0 Gauge trainset, I have moved variously through 00, 00n3, 009, 00 (again), 00n3 (again) and now into G gauge. I have more than enough unfinished modelling work to engage my interests for many years to come without starting yet another project. At least, that's what I keep telling myself (and the wife!).

How I constructed an open wagon and a closed van from a GRS 'combi' kit

The kit arrives in a box complete with everything needed, including two LGB wagon chassis which have been sliced in twain - the two shorter pieces forming the chassis for the open wagon and the two longer pieces making the van chassis.


The open wagon
The kit is supplied with the body from an LGB open wagon. Normally this has a balcony at one end (which is why the chassis is longer at one end than the other).


The pivot for one of the axles needed to be removed from the former balcony end as this axle needs to be moved back.


A replacement pivot was superglued 50mm from the end.


I decided to remove the air cylinders .......


...... and all but one of the brake shoes, as my wagons are not air-braked.


The body was given two coats of Halfords grey primer.........


and the two halves of the chassis were then screwed on to the body .....


..... and the wheels and couplings fixed back in place.


The metal work was picked out in black acrylics


The wagon is still awaiting cosmetic brake gear (see below) and weathering, but has now joined the expanding fleet of open wagons (see Stock List).

The van
The van is a more complicated kit than the open wagon as it contains more parts. However, construction is quite straightforward - the instructions are reasonably easy to follow.


The instructions gave the option of removing the buffer-beams from the ends of the van or removing the draw bars from the ends of the chassis. I decided to remove the buffer beams from the van. On reflection I wish I'd removed the draw bars as the buffer beams look more prototypically UK.


As with the open wagon, I removed the air tanks, cylinders and all but one of the brake shoes from the chassis.


The sides of the van were then glued to the ends. The ends are moulded to include slots for the sides, which are pre-cut from scribed styrene sheet.


A sub-base was then glued to the base, to allow for clearance of the balcony floor mouldings on the ends of the chassis. The base was then glued to the sides and ends.


The plastic mouldings for the bracing framework was then divided and tidied up with emery.....


...... before being glued to the sides.


Four pieces of styrene strip were then glued across the top and bottom of the door openings. The openings could be cut out as the doors can be made to slide, but I decided not to take this additional step.


The mouldings for the door slides were then glued in place.


The scribed styrene for the doors was then trimmed to size and slotted into the slides. I glued the doors in place.


The strip for the door framing was then cut to size and glued in place. I mitred the corners but these could be butted together as, once painted, the joint will not show.


The mouldings for the corner brackets were then glued on ........


.... and the door catch added. This comprises three pieces, the eye, the hook and a tack for the pivot. I added a couple of pieces of styrene off-cut beneath the pivot to act as a door-stop and provide a more realistic support for the pivot.


A stiffener was then glued across the top of the body between the doorways.


With the body more or less finished, I now turned my attention to the roof. Pre-formed brackets were glued to the pre-curved roof.


Pivots for the axle assemblies were glued 63mm from each end of the base.


The two chassis halves were then screwed to the base .......


.... and the wheels slotted back into place.


The roof was slotted into place and ......


....... and door handles were bent from the provided piano wire and added to the doors. The van was then completed in terms of the kit as supplied.

Cosmetic brake gear
As my wagons are not vacuum-braked, I usually add cosmetic brake gear. Firstly, I fashioned a 12.5cm long brake lever from 2mm thick plasticard, 4mm wide, tapering to 2mm and rounded at each end with emery.
 

A 10mm x 10mm triangular bracket was cut from 2mm plasticard (I slightly over-engineer these fittings as they are susceptible to knocks).


The brake hanger was made from a 30mm length of 3mm wide x 2mm thick plasticard, a 30mm length of 1mm thick plasticard into which holes were drilled at 3mm intervals, and two 4mm lengths of 2mm thick strip.


These were glued togther and one end rounded with emery.


A mounting bracket was made for the hanger from off-cuts of plasticard, then the whole assembly was glued with Bostik 'hard plastics' glue to the underframe.


The van was now ready for painting.


The body was removed from the chassis and given two coats of Halfords grey primer from a rattle can. The ironwork was then picked out in black acrylics.


At some point in the future, the van will be weathered in my time-honoured fashion, of mucky brown/black acrylics daubed on and wiped off while still wet. A light spray with Humbrol matt sand and dark earth will complete the model.