Having recently built a Houstoun Gate Loco Works (HGLW) kit and got it running with radio control How I constructed a HGLW kit), I then set about detailing it.
in a day (see


I cast about the net for some inspiration and, although not a direct comparison, the Amberley Museum's Fowler loco, Peldon, looked as if she was close enough to offer me some ideas for detailing.
To accommodate the couplings, the buffer beams on the chassis needed to be slotted to approximately the right height. This was achieved with a razor raw and Stanley knife.

Next, the mounting blocks for the couplings needed to be fashioned. I discovered that a piece of 25mm thick stripwood, plus to pieces of 3mm thick plywood would allow the couplings to be mounted at the right height. These were drilled with a 3mm hole for a bolt.

A 3mm hole was also drilled in the chassis plate for the bolt .....

..... and passed through the layers of mounting block ........

...... to allow the coupling to be bolted into place. I discovered that Hartland Loco Works (HLW) couplings were more suitable as the springs on LGB couplings fouled the wheels.
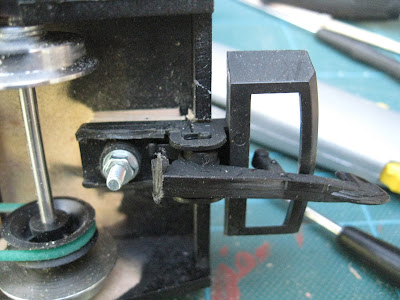
The couplings were mounted to stand out by 4mm from the chassis buffer beams to give room for the buffer beams on the loco body.

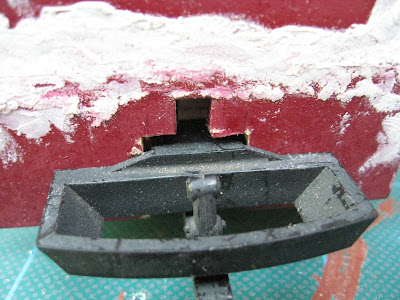
The buffer beams on the body were slotted to take the couplings, .......

...... so the body could be slid into place over them.
Finally, Binnie Engineering medium sized Carmarthen couplings were glued above the LGB couplings as dummies to disguise the presence of the LGB couplings and to give the buffer beams a more realistic appearance. Cambrian Models plastic rivet heads were also glued on to the buffer beams for cosmetic effect.

Six 30mm lengths of 4mm diameter Plastruct tube were cut as was a 40mm x 40mm piece of 1.5mm thick black plasticard. Lines of plastic solvent adhesive were placed on the plasticard sheet ......

.... and the tubes fixed to them.

The 'radiator' was then given a couple of coats of Halford's grey primer, followed by a couple of coats of Halford's satin black.

After the loco body had been painted (see below), the radiator was glued behind its opening at the front of the bonnet (with superglue)........

...... and the mesh trimmed to 30mm x 30mm to fit. This was sprayed with grey primer and a couple of coats of Halford's Rover Brooklands Green before being glued into the aperture.


3mm holes were drilled into the ends of the 4mm plastic rod and the copper tubes inserted and glued into place with superglue.

The exhaust was given a couple of coats of grey primer followed by a couple of coats of satin black. ......

..... before being weathered with matt acrylics and glued in place on the loco bonnet.


After filling, rubbing down, another coat of primer, more filling and rubbing down, and another coat of primer, she was given a couple of coats of Halford's Rover Brooklands Green.

The buffer beams were given a couple of coats of Plasti-kote Insignia Red.

The loco was then lightly rubbed down and given a couple of coats of Halford's clear varnish and the roof given a coat of matt black acrylic paint.


2mm holes were drilled in the cab sides to take the rails ........

..... and 2mm brass washers were threaded on .......

...... before being glued into place with superglue.

I think the details have complemented the model well - and given her a sense of identity. I might still add some more details, particularly inside the cab which is, at present, a bit stark. The driver (Jon's People) needs some controls and gauges, a brake standard and maybe a seat. There also needs to be a bit of clutter, such as an oil can, toolbox and starting handle.
I was delighted with the kit which was extremely easy to build and provided a good canvas on which to express some individuality. I might add some lead to improve adhesion but I have given her a test run and was pleased to see she sould pull six wagons with ease. Given that she will be assigned to shunting duties at the sawmill, it is unlikely she will be required to haul anything greater. Once the weather improves, I will have a proper operating session and shoot some video of her in action.
PS - I have now also added an Acme multi-cylinder sound card - see How I added a sound card to my HGLW diesel loco

in a day (see

Contents
Introduction
As you can see, although it was running by the end of the day, it was not exactly looking pretty.
I cast about the net for some inspiration and, although not a direct comparison, the Amberley Museum's Fowler loco, Peldon, looked as if she was close enough to offer me some ideas for detailing.
 |
| Source: http://www.amberleynarrowgauge.co.uk/peldon.htm |
Couplings
For the loco to become a useful member of the Peckforton Light Railway's roster, she would need to be equipped with LGB style couplings. I know they are not the most realistic type of coupling, but I do a lot of shunting operations on my railway and I have not yet discovered a suitable replacement for them which is as reliable and cheap.To accommodate the couplings, the buffer beams on the chassis needed to be slotted to approximately the right height. This was achieved with a razor raw and Stanley knife.

Next, the mounting blocks for the couplings needed to be fashioned. I discovered that a piece of 25mm thick stripwood, plus to pieces of 3mm thick plywood would allow the couplings to be mounted at the right height. These were drilled with a 3mm hole for a bolt.

A 3mm hole was also drilled in the chassis plate for the bolt .....

..... and passed through the layers of mounting block ........

...... to allow the coupling to be bolted into place. I discovered that Hartland Loco Works (HLW) couplings were more suitable as the springs on LGB couplings fouled the wheels.

The couplings were mounted to stand out by 4mm from the chassis buffer beams to give room for the buffer beams on the loco body.

The buffer beams on the body were slotted to take the couplings, .......

...... so the body could be slid into place over them.

Finally, Binnie Engineering medium sized Carmarthen couplings were glued above the LGB couplings as dummies to disguise the presence of the LGB couplings and to give the buffer beams a more realistic appearance. Cambrian Models plastic rivet heads were also glued on to the buffer beams for cosmetic effect.

Radiator
The kit came with some aluminium mesh for the radiator grille but scrutiny of various photos of 'Peldon' revealed what looks like black vertical tubes with cooling fins behind the grille. As it would be hidden behind the grille, I decided that a simple representation of this would be sufficient.Six 30mm lengths of 4mm diameter Plastruct tube were cut as was a 40mm x 40mm piece of 1.5mm thick black plasticard. Lines of plastic solvent adhesive were placed on the plasticard sheet ......

.... and the tubes fixed to them.

The 'radiator' was then given a couple of coats of Halford's grey primer, followed by a couple of coats of Halford's satin black.

After the loco body had been painted (see below), the radiator was glued behind its opening at the front of the bonnet (with superglue)........

...... and the mesh trimmed to 30mm x 30mm to fit. This was sprayed with grey primer and a couple of coats of Halford's Rover Brooklands Green before being glued into the aperture.

Exhaust
The exhaust pipe and silencer on Peldon is quite prominently positioned on top of the bonnet. To represent this, two short lengths of 3mm copper tube were cut (one 60mm long and the other 20mm long). In addition, a 40mm length of 6mm Plastruct tube and a 38mm piece of 4mm plastic rod was cut. I piece of flattened copper wire was wrapped around the top of the longer piece of copper tube and soldered into place. The ends of the copper tubes were bent through 90 degrees (after a piece of brass rod had been inserted to stop the tubes from kinking).
3mm holes were drilled into the ends of the 4mm plastic rod and the copper tubes inserted and glued into place with superglue.


..... before being weathered with matt acrylics and glued in place on the loco bonnet.

Painting
I had originally intended to paint the loco maroon (hence the original primer coat of red oxide), but after giving her an initial coat, I changed my mind. The body was rubbed down and given a couple of coats of Halford's grey primer (after the apertures had been masked).
After filling, rubbing down, another coat of primer, more filling and rubbing down, and another coat of primer, she was given a couple of coats of Halford's Rover Brooklands Green.

The buffer beams were given a couple of coats of Plasti-kote Insignia Red.

The loco was then lightly rubbed down and given a couple of coats of Halford's clear varnish and the roof given a coat of matt black acrylic paint.


Grab rails
The grab-rails are essentially two 35mm long pieces of 2mm thick brass rod, bent at each end.
2mm holes were drilled in the cab sides to take the rails ........

..... and 2mm brass washers were threaded on .......

...... before being glued into place with superglue.

Conclusion
I am pleased I decided to paint her the same colour as the rest of my loco stud - I don't think I was influenced by Peldon's colour scheme, but who knows.I think the details have complemented the model well - and given her a sense of identity. I might still add some more details, particularly inside the cab which is, at present, a bit stark. The driver (Jon's People) needs some controls and gauges, a brake standard and maybe a seat. There also needs to be a bit of clutter, such as an oil can, toolbox and starting handle.
I was delighted with the kit which was extremely easy to build and provided a good canvas on which to express some individuality. I might add some lead to improve adhesion but I have given her a test run and was pleased to see she sould pull six wagons with ease. Given that she will be assigned to shunting duties at the sawmill, it is unlikely she will be required to haul anything greater. Once the weather improves, I will have a proper operating session and shoot some video of her in action.

No comments:
Post a Comment