Updated 19/5/22
I am offering this beginners' guide to battery power for trains based on my personal experiences of having trodden the path, seeking advice, experimenting, getting stuck-in and learning from my mistakes. Hopefully, this blog post will answer some of the questions and help you to avoid some of the problems as you make a move to powering your locos with batteries and operating them with radio control.
Over the past fourteen years, I have constructed or converted dozens of locomotives to battery power for my own railway and have converted at least the same number for other people. A quick look at my railway's stock list will give a feel for the range of battery powered locos which I now have on my railway (see Stock List). This page focuses on my locos and their origins together with this video, made a couple of years ago, will give you a feel for some of my locos and how they are powered and controlled ......
I would like to thank fellow garden railway modeller, Greg Hunter from Sydney, for suggesting enhancements to the information in this posting and also whose railway and website (the Sandstone and Termite Railway) has provided considerable guidance and inspiration over the years.

 If you are confident (and successful) with making your own mechanisms then skip this section - but if, like me, your skills with mechanics are dubious, then I'd advise you to use a commercial mechanism or convert a track-powered loco to battery power and radio control. The easiest way to do this is to put the batteries and radio-control equipment into a trail-car (eg a box-van) and then run two wires from this to the loco. One trail car can then be used to power and control many locomotives
Until quite recently, the only types of rechargeable battery which were available for modellers were NiCads or lead acid cells. However, battery technology has advanced quite considerably and now quite high capacity NiMh and Li-ion batteries are readily available for quite reasonable prices (see also - A quick introduction to batteries for model trains)
 It is advisable to buy a decent 'intelligent' charger for your batteries. This will help to ensure the batteries are charged efficiently and will help to prolong their life. For more information see below.
 A feature of rechargeable batteries is that they have very low internal resistance which means that if they are short-circuited (ie the +ve and -ve leads are connected together) then they will rapidly become overheated or could even explode. To avoid this from happening accidentally (which could make a mess of your prize loco), some sort of fuse or auto-reset cut-out needs to be included in the circuit. Alternatively (or additionally), if using lithium-ion cells, you will need a Battery Management System (BMS) board to monitor and control charging and discharging and check for short circuits. For more information see below.
 Some sort of switch needs to be included in the circuit to isolate the battery from the other components. This will avoid the batteries running down when the loco is not in use. A two-way switch, wired into the circuit as above, would enable the batteries to be recharged when the loco is not in use. There are many styles of switch which could be used (see below for more information)
 These vary in complexity and cost from the most basic (costing around £10) to the highly sophisticated (costing £80+). It's advisable to go for an ESC which has been designed specifically for use with railway locomotives. This will ensure it can handle the electrical loads which will be placed on it, it will allow for cruise control (ie the transmitter can be turned off an the loco will keep on running at its previous setting) and includes some outputs to control lighting, sound and (if required) remote uncoupling. See below for more information
 I've put these together under one heading as the system you choose will need to have receivers and transmitters which are compatible. Every loco will need a receiver but the number of transmitters you need will be largely dependent on how you intend to run your railway. With 2.4gHz technology it's possible for one transmitter to be bound with up to 99 receivers. Clearly, you can only operate one at a time, but you could switch on each loco as and when it's required and turn it off when it's not needed. Alternatively, there are some systems which can communicate with more than one loco - See below for more information
A few manufacturers produce off-the-shelf radio controlled locomotives for use in the garden. These range from larger manufacturers such as Bachmann and Playmobil, to more specialist producers of garden railway equipment such as Brandbright and Roundhouse. Ready to run standard gauge models for Gauges 0, 1 or 3 can be purchased through agents such as Ellis Clark
The advantages of using readymade products are fairly clear, especially if you are not confident with constructing your own models, The disadvantages are that the range of stock is limited to that which is available and also the relative costs compared with constructing or converting models.
Over the past fourteen years, I have constructed or converted dozens of locomotives to battery power for my own railway and have converted at least the same number for other people. A quick look at my railway's stock list will give a feel for the range of battery powered locos which I now have on my railway (see Stock List). This page focuses on my locos and their origins together with this video, made a couple of years ago, will give you a feel for some of my locos and how they are powered and controlled ......
I would like to thank fellow garden railway modeller, Greg Hunter from Sydney, for suggesting enhancements to the information in this posting and also whose railway and website (the Sandstone and Termite Railway) has provided considerable guidance and inspiration over the years.
 |
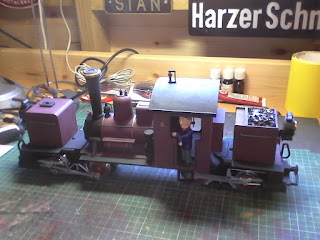
| A much modified LGB Stainz battery powered loco |
Contents
- What is needed?
- Motors and mechanisms
- Off the shelf models
- Adapting track powered locos
- Kitbuilt locos
- Scratchbuilt body on a motor block
- Scratchbuilding
- Batteries
- Battery care and protection
- Switches
- Charge sockets
- Electronic Speed controllers (ESCs)
- Receivers and Transmitters
- Railway Specific radio control systems
- Cliff Baker speed controllers
- Timpdon UltraRad
- Deltang / RC Trains
- Railboss 4
- RCS
- LocoLinc
- Aristocraft Revolution
- Bluetooth
- Advantages of Battery Power vs Track Power
- Disadvantages of Battery Power
- Conclusion
What is needed?
The basic requirements for a battery-powered radio control system are:
- A transmitter - to send signals remotely to each locomotive
- A receiver - in each loco to receive the signal from the transmitter
- An electronic speed controller (ESC) - in each loco to interpret the signal from the receiver and control the speed of the motor (and operate add-ons such as lights, sound cards etc)
- Batteries - these are generally rechargeable though it is possible to use normal 'throwaway' batteries

In brief
Motor / mechanism

Batteries

Until quite recently, the only types of rechargeable battery which were available for modellers were NiCads or lead acid cells. However, battery technology has advanced quite considerably and now quite high capacity NiMh and Li-ion batteries are readily available for quite reasonable prices (see also - A quick introduction to batteries for model trains)
Battery charger
 It is advisable to buy a decent 'intelligent' charger for your batteries. This will help to ensure the batteries are charged efficiently and will help to prolong their life. For more information see below.
Fuse or cut-out

Switch

Electronic Speed Controllers (ESCs)

Receivers & Transmitters

More detailed information
To expand upon the outline information above, I've tackled each of the above sections in more detail. I've also tried to provide links to specific product information and to generalised information. Inevitably, this information will become outdated over time although I will try to update it occasionally. If you spot any inaccuracies or omissions, please let me know via the comments section below this posting.A few manufacturers produce off-the-shelf radio controlled locomotives for use in the garden. These range from larger manufacturers such as Bachmann and Playmobil, to more specialist producers of garden railway equipment such as Brandbright and Roundhouse. Ready to run standard gauge models for Gauges 0, 1 or 3 can be purchased through agents such as Ellis Clark
 |
| Some of the RTR models available |
The advantages of using readymade products are fairly clear, especially if you are not confident with constructing your own models, The disadvantages are that the range of stock is limited to that which is available and also the relative costs compared with constructing or converting models.
 |
| Roundhouse Hercules battery powered loco. Source: https://www.roundhouse-eng.com/hercules.htm |
Converting track-powered locos
The simplest way of making a battery-powered, radio controlled locomotive is to adapt a track-powered commercially produced loco. It is possible to adapt a track powered loco in one evening - provided all the necessary components are to hand and it is relatively easy to gain access to the insides of the loco (eg see How I converted an LGB Stainz loco to battery power). It is advisable to dismantle the locomotive and remove the pick-ups and skates used for transferring the power from the track to the motor. There are two reasons for doing this; to avoid accidental short-circuiting from the motor and to reduce drag on the wheels. The batteries will need to be installed somewhere in the loco (or in a trail-car), together with the receiver and ESC. Clearly, the larger the loco, the more space is available. The other consideration is that the batteries need to be matched to the voltage requirements of the locomotive. Although most track-powered locos run on 20-24 volts, it's often possible to run them successfully on 12-16 volts and I even know some modellers who power their locos with as little as 6-9 volts. Some experimentation may be required to find out the power needs of a loco before cramming in more batteries than may actually be required. |
| A trail-car with batteries and controller installed - Source: http://ovgrs.org/the-trains/power-cars/what-is-a-power-car/ |
For some examples of converting track-powered locos to battery power see:
- Converting an Aristocraft Dash 9 to battery r/c
- Converting locos to dual power (battery and track)
- Converting an LGB Stainz to battery r/c with a trail car
- Converting a Bachmann Thomas to battery r/c
- Dummies guide to battery conversion
The advantages over converting track powered locos is the many kits are designed for the immediate installation of radio control equipment while others can be easily modified to replace their manual control systems provided with the kit with radio control circuitry.
.webp) |
| Phil Sharples kits are inexpensive and easily modified to RC. Source: https://philsharples.com/shop |
A few examples of the construction of kitbuilt locos for radio control:
If you have access to a 3D printer, then another approach to creating battery powered, radio controlled model locos is to download the parts needed to construct the loco from the internet from sites such as Thingiverse, printing them out and then constructing the loco.


The most complex approach to providing motive power for your railway is to construct a locomotive entirely from scratch. Clearly, the only restriction on the type of loco which you can build is the limitations of your skills and knowledge. Whilst I have constructed my own mechanisms, I have found more success in using gearbox motors such as those provided by MFA Como. However, there are plenty of examples of modellers with more skill than me who have scratchbuilt entire models and their mechanisms.
Amp hours. When buying batteries, you need to look for the highest capacity you can afford. Capacity is measured in terms of amp-hours (Ah) or milliamp-hours (mAh). In effect a 6800mAh would power a motor which draws 1 amp for 6.8 hours (a milliamp is 1/1000th of an amp, so 6800mAh = 6.8amp hours). The higher the amp-hours, the longer your loco will run without recharging.

If using discrete battery cells it's possible to configure them your particular needs (dependent on the space available).
Connecting them in series will increase the voltage without affecting the the current flow. For example, four 1.2 volt, 1000mAh batteries connected in series will give you 4.8v and 1000mA.

Connecting them in parallel will increase the current capacity but not affect the voltage. So, three 1.2 volt, 1000mAh batteries connected in parallel will give you 1.2 volts and 3000mAh of current capacity (ie you’ll get a longer run).

It's possible to increase both voltage and current flow. For example, two 1.2 volt, 1000mAh batteries wired in series, connected in parallel with another pair of 1.2 volt, 1000mAh batteries will give you 2.4 volts and 2000mAh.

When combining batteries, it is very important to make sure all the batteries in the configuration are of the same type and rating. In addition, it is preferable to make sure they are all charged to the same level before being connected together.
NiMH batteries
The main advantage of NiMHs over NiCds is that they do not suffer from the problems of memory effect which meant that NiCds had to be fully discharged before they could be recharged, otherwise they would steadily become less efficient at holding their charge. Furthermore, NiMH batteries can be made with higher capacities, are more environmentally friendly and hold their charge for longer - particularly if they are Low Self Discharge (LSD) cells.
 A virtue of NiMHs is that they are readily available in standard battery sizes (eg AAA, AA, C, etc.). Batches of batteries can easily be combined together to make battery packs of various voltages in a range of configurations to fit into the spaces available inside your loco body. The disadvantage of NiMHs is that they leak charge over time and so need to be topped up if the loco is not used for a while. Also, AA cells are often self-limiting to around 0.5amps of discharge, which means they are likely to be unsuitable for large locos or those needing to haul heavy loads.

Whilst you can make up your own battery packs by using standard sized batteries and battery boxes it is more reliable to either buy tagged batteries and solder them together, or to buy ready-made battery packs. These can be ordered from suppliers such as Strikalite in tailor-made configurations.


Li-ion and LiPo batteries
The reason we can now buy electrically powered model aircraft and helicopters is largely due to the development of high power, low weight Li-Po batteries. Whilst these can be used to power garden railway locos, the technology is somewhat edgy, though reliability and safety is constantly being improved. Li-Po batteries require quite careful handling and, if not recharged properly can prove very temperamental. However, the availability of LiPo batteries is increasing and their reliability is improving considerably. If you decide to explore this technology, it is advisable to discuss your requirements with a specialist supplier and invest in a high quality intelligent charger.
Li-ion batteries are widely available and are found powering mobile phones, laptop and tablet computers and higher quality cordless drills. Li-ion batteries are available in standard battery sizes and readily as packs in combinations of cells

With the battery locos I've built so far, two were originally powered by NiMH batteries but now they all use Li-ion batteries.
The most recent locomotive (see How I constructed a Manning Wardle 0-6-0ST) is powered by three 18650 lithium ion batteries - which are often found inside laptop battery packs. The 18650 batteries which I have used do not include protection PCBs and so I have included a BMS board.

These need to be charged carefully with a dedicated balance charger (see below). I wired-in a balance charge socket (bought from eBay) into the circuit to allow for balance charging (see below).
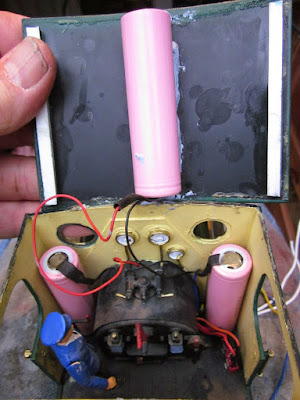

The wiring for this board was very straightforward and logical ......

Protection boards are essential when using li-ion batteries. As has been mentioned above, lithium-ion batteries need to be handled with extreme care. If mishandled or charged incorrectly they can suffer a thermal run-away - a chemical reaction which at the very least causes them to vent gasses and at worst will result in them bursting into flames. Battery protection boards help to prevent situations where this can occur. Furthermore, li-ion cells will become permanently damaged if their charge drops below 2.7v (or 3v to be on the safe side).
As can be seen from the above diagram, the protection board is wired-up to each cell in a battery pack to monitor its state of charge. For example, here's the wiring for a two-cell pack

...... and here's the wiring for a two different three-cell packs.


Battery protection boards are made for all sizes of battery packs which are likely to be used in model trains. They are categorised according to the number of cells making-up the pack - 1S = one cell, 2S = two cells in series, 3S = three cells in series, and so on. They can be purchased from eBay - just search for "battery protection 2S" or whatever.
Most boards will prevent the cells becoming overly discharged (ie dropping below 3v or thereabouts), over-charging (ensuring the voltage in each cell does not exceed 4.2v or thereabouts) and short circuits. Some of the more sophisticated protection boards include a temperature sensor to check the pack doesn't become overheated. You can also buy boards which automatically handle balance charging (see below), which ensures the voltages of the cells in the pack are equal. Some Electronic Speed Controllers (ESCs), including the more recent Deltang receiver/controllers which I use, incorporate battery monitoring circuitry to prevent the over-discharge of li-ion/Lipo cells.
- IP Engineering Diesel loco kit construction
- IP Engineering railcar kit construction
- HGLW small diesel loco kit construction
 |
| IP Engineering diesel kit-built loco |
More complex kits which can be used for radio control are supplied by Garden Railway Specialists. These are well detailed but require more modelling expertise than those provided by the other kit suppliers. Some of their kits use motor blocks from manufacturers such as LGB while others use their own chassis kits.
Downloading and 3D printing models
 |
| Hunslet loco constructed from a GRS kit |
Downloading and 3D printing models
If you have access to a 3D printer, then another approach to creating battery powered, radio controlled model locos is to download the parts needed to construct the loco from the internet from sites such as Thingiverse, printing them out and then constructing the loco.
For example, I constructed this matching pair of small diesel locos by downloading the parts from Thingiverse.

See How I 3D printed and constructed a pair of diesel locos
The next most complex approach to creating a battery powered loco is to scratchbuild a body on a commercially produced motor-block or chassis. Motor blocks (ie LGB, Bachmann, Aristocraft, Piko, USA Trains) can be purchased new from various outlets; a quick browse of the internet will reveal several sources (eg see - Topslotsntrains)
The next most complex approach to creating a battery powered loco is to scratchbuild a body on a commercially produced motor-block or chassis. Motor blocks (ie LGB, Bachmann, Aristocraft, Piko, USA Trains) can be purchased new from various outlets; a quick browse of the internet will reveal several sources (eg see - Topslotsntrains)
 |
| Piko motor blocks |
Alternatively, a secondhand loco can be purchased through an online auction site and the body discarded. Most of my locos started life in this way - using the LGB ToyTrain 0-4-0 motor block used in some of their starter train set locos (eg Otto, Oho, Rusty).
 |
| LGB Toytrain loco Rusty |
The resultant loco can be entirely freelance, maybe based on the body of the donor locos, or a model of a prototypical loco.

 |
| Two Garrett style locos based on LGB Stainz locos (see below) |
If, like me, you are not entirely successful in constructing your own chassis, then this provides a more reliable means of ensuring your loco will actually function. I have constructed several locos using commercial motor blocks, most of which are now battery powered. For example:
- 0-6-2T based on Southwold Railway loco Wenhaston using an LGB motor block
- 2-4-2T based on Southwold Railway loco Southwold using a Playmobil motor block
- 0-6-0 British loco based on a Piko motor block
- A 'baby garrett' loco from two LGB Stainz motor blocks
- Various Garrett locos based on commercial motor blocks
- Scratchbuilt body on LGB chassis
Another approach to scratchbuilding you bodies is to draw them using a 3D CAD package such as Sketchup or TinkerCAD, printing them out and constructing them.
For example, I used TinkerCAD to produce the parts needed for this Kerr Stuart loco which sits on a modified Bachmann Lyn motor block.

I have placed the parts for this model as a free download on Thingiverse.
The most complex approach to providing motive power for your railway is to construct a locomotive entirely from scratch. Clearly, the only restriction on the type of loco which you can build is the limitations of your skills and knowledge. Whilst I have constructed my own mechanisms, I have found more success in using gearbox motors such as those provided by MFA Como. However, there are plenty of examples of modellers with more skill than me who have scratchbuilt entire models and their mechanisms.
 |
| Scratchbuilt industrial diesel on the Bellfield Hall Works Railway |
- A scratchbuilt railmotor with an MFA gearbox motor
- Accounts of scratchbuilt garden railway locos
- Scratchbuilt diesel loco
- Scratchbuilt Duncan loco
Batteries
Whilst it is possible to run locos with non rechargeable batteries, it is more economical to use rechargeable batteries.In the past, rechargeable batteries meant NiCds (Nickel Cadmium), but these have now been largely superceded by NiMH (Nickel Metal Hydride), Lithium-ion and Lithium Poly (Li-po) batteries. These batteries hold higher charges and in the case of Li-ion and Li-po are substantially smaller.Amp hours. When buying batteries, you need to look for the highest capacity you can afford. Capacity is measured in terms of amp-hours (Ah) or milliamp-hours (mAh). In effect a 6800mAh would power a motor which draws 1 amp for 6.8 hours (a milliamp is 1/1000th of an amp, so 6800mAh = 6.8amp hours). The higher the amp-hours, the longer your loco will run without recharging.

If using discrete battery cells it's possible to configure them your particular needs (dependent on the space available).
Connecting them in series will increase the voltage without affecting the the current flow. For example, four 1.2 volt, 1000mAh batteries connected in series will give you 4.8v and 1000mA.

Connecting them in parallel will increase the current capacity but not affect the voltage. So, three 1.2 volt, 1000mAh batteries connected in parallel will give you 1.2 volts and 3000mAh of current capacity (ie you’ll get a longer run).

It's possible to increase both voltage and current flow. For example, two 1.2 volt, 1000mAh batteries wired in series, connected in parallel with another pair of 1.2 volt, 1000mAh batteries will give you 2.4 volts and 2000mAh.

When combining batteries, it is very important to make sure all the batteries in the configuration are of the same type and rating. In addition, it is preferable to make sure they are all charged to the same level before being connected together.
NiMH batteries
The main advantage of NiMHs over NiCds is that they do not suffer from the problems of memory effect which meant that NiCds had to be fully discharged before they could be recharged, otherwise they would steadily become less efficient at holding their charge. Furthermore, NiMH batteries can be made with higher capacities, are more environmentally friendly and hold their charge for longer - particularly if they are Low Self Discharge (LSD) cells.


Whilst you can make up your own battery packs by using standard sized batteries and battery boxes it is more reliable to either buy tagged batteries and solder them together, or to buy ready-made battery packs. These can be ordered from suppliers such as Strikalite in tailor-made configurations.


There is considerable and sometimes heated debate as to whether NiMh are preferable to lithium cells in battery powered locos - with some people pointing the instability of lithium-based battery technology and citing cases where lithium cells have caused fires. However, as in most things there are pros and cons with each form of cell.
NiMh Pros
- Packs of cells don't need balance charging
- Less volatile than lithium cells
- Can be transported through the post and on aircraft
- Battery management is easier as they can handle over-charging better than lithium cells
NiMh Cons
- Each cell is limited to 1.2v and so three times as many cells are needed to achieve the same voltage as lithium cells
- NiMh cells self-discharge when stored (ie they lose their charge) unless Low Self Discharge (LSD) cells are used
Li-ion Pros
- Each cell holds 3.6v and so fewer cells are needed (eg three li-ion cells for a 12v supply v 10 NiMh cells)
- This means that battery packs can be smaller and so will fit into even tiny locos
Li-ion Cons
- Li-ion cells must be handled with great care to avoid short circuit, over-charging and over-discharging
- Li-ion packs must be protected with Battery Management Systems (BMS) and charged carefully
- Li-ion cells cannot be sent through the post unless they are contained within a device (ie are protected)
Whether you use NiMh or Lithium cells, it is essential to handle your battery packs with care, charge them with the correct type of charger, protect them with fuses and/or battery protection / BMS boards (see below) and pay careful attention to how they are wired-up.
The reason we can now buy electrically powered model aircraft and helicopters is largely due to the development of high power, low weight Li-Po batteries. Whilst these can be used to power garden railway locos, the technology is somewhat edgy, though reliability and safety is constantly being improved. Li-Po batteries require quite careful handling and, if not recharged properly can prove very temperamental. However, the availability of LiPo batteries is increasing and their reliability is improving considerably. If you decide to explore this technology, it is advisable to discuss your requirements with a specialist supplier and invest in a high quality intelligent charger.

Li-ion batteries are widely available and are found powering mobile phones, laptop and tablet computers and higher quality cordless drills. Li-ion batteries are available in standard battery sizes and readily as packs in combinations of cells

With the battery locos I've built so far, two were originally powered by NiMH batteries but now they all use Li-ion batteries.
The most recent locomotive (see How I constructed a Manning Wardle 0-6-0ST) is powered by three 18650 lithium ion batteries - which are often found inside laptop battery packs. The 18650 batteries which I have used do not include protection PCBs and so I have included a BMS board.
These need to be charged carefully with a dedicated balance charger (see below). I wired-in a balance charge socket (bought from eBay) into the circuit to allow for balance charging (see below).
With other battery installations or conversions, I have distributed the cells around the loco rather than creating a single pack. Thus, I can make maximum use of the space available inside my locos.

The nomenclature for cylindrical lithium cells indicates the dimensions of the cell. So, for example, an 18650 cell has a diameter of 18mm and a length of 65mm and a 14500 (AA sized) cell as a diameter of 14mm and a length of 50mm. This makes the planning for fitting cells into your locos relatively straightforward. - but bear in mind that the cells you use in each pack must be identical in dimensions and capacity.
Battery protection
Lithium battery protection boards / Battery Management System (BMS) boards
I have now included a battery protection board in this loco (and another - see How I converted a track powered loco to battery power) to monitor battery charging, protect against accidental short-circuit and also to ensure the cells do not become over-discharged.The wiring for this board was very straightforward and logical ......
Protection boards are essential when using li-ion batteries. As has been mentioned above, lithium-ion batteries need to be handled with extreme care. If mishandled or charged incorrectly they can suffer a thermal run-away - a chemical reaction which at the very least causes them to vent gasses and at worst will result in them bursting into flames. Battery protection boards help to prevent situations where this can occur. Furthermore, li-ion cells will become permanently damaged if their charge drops below 2.7v (or 3v to be on the safe side).
As can be seen from the above diagram, the protection board is wired-up to each cell in a battery pack to monitor its state of charge. For example, here's the wiring for a two-cell pack

...... and here's the wiring for a two different three-cell packs.


Battery protection boards are made for all sizes of battery packs which are likely to be used in model trains. They are categorised according to the number of cells making-up the pack - 1S = one cell, 2S = two cells in series, 3S = three cells in series, and so on. They can be purchased from eBay - just search for "battery protection 2S" or whatever.
Most boards will prevent the cells becoming overly discharged (ie dropping below 3v or thereabouts), over-charging (ensuring the voltage in each cell does not exceed 4.2v or thereabouts) and short circuits. Some of the more sophisticated protection boards include a temperature sensor to check the pack doesn't become overheated. You can also buy boards which automatically handle balance charging (see below), which ensures the voltages of the cells in the pack are equal. Some Electronic Speed Controllers (ESCs), including the more recent Deltang receiver/controllers which I use, incorporate battery monitoring circuitry to prevent the over-discharge of li-ion/Lipo cells.
If you do not have the confidence or expertise to make your own battery packs then they can be purchased ready-made with built-in protection from companies such as Rapid Electronics and RS Components.
NOTE: If you do decide to make your own lithium battery packs then make sure you buy cells from reputable sources such as Ecolux. The 'too good to be true' offers you see on eBay are exactly that - the cells are generally poorer quality and often do not have the capacities which are claimed - I speak from experience.
Probably the charger most widely used by radio control modellers at present is the iMax B6.

Although it is often advertised as being for charging Lipo batteries it will also handle NiCd, NiMH, lead-acid and Li-ion batteries. Its major advantage is that it can be programmed for a wide range of battery types and voltage configurations and has an inbuilt memory enabling the user to store a series of set-ups for each loco. The unit also has settings for fast charging, discharging, conditioning and charging for long-term storage of batteries (eg over winter).
For more information on setting-up and using the iMax B6 charger see - A Quick Introduction to the iMax B6 charger
To keep a lithium battery pack healthy, it is advisable to balance-charge the pack from time to time. As indicated above, wiring-up a battery pack to include a balance-charge lead is very straightforward. As with the battery protection board (see above), the balance-charge lead needs to be connected to each end of the cells in a pack.
 This is for a 2S battery pack (with wiring for a Deltang Rx65b combined receiver/controller). The wiring for a 3S pack would be similar. This is for a 3S 2P pack:
 The additional yellow fuse is not really necessary as the protection board will protect the batteries from short circuits. However, I prefer to have too much protection than too little.
When balance charging a pack, the charger needs to be connected to the pack through the balance charge lead and some chargers will also need to be connected via the main charge lead. For more information on balance charging with the iMax B6 charger see - A quick guide to the iMax B6 charger.
Of course, if you use battery boxes and remove individual batteries for charging, then the charger will ensure that each cell has an equal charge.
The simplest type of fuse is the glass fuse.

This type of fuse is a relatively cheap and effective way of protecting the batteries from short circuit. It will need a fuse holder and a stock of replacement fuses rated at the maximum tolerance of the motor. However, while this type of fuse is sufficient to protect batteries from direct short-circuits, it is less reliable for overload protection as it can be slow to respond, by which time damage may have been done. Furthermore, unless the fuse is located somewhere convenient, it can be a nuisance to replace when it blows.
Resettable circuit breakers, while more expensive, provide a more reliable and convenient method of protection. There is a range of different types but the most convenient for use in model locos is probably the Polyswitch which is a small electrical component which detects the current flow and if it exceeds that for Polyswitch is rated it will cut the supply until the overload is removed. Whilst the fuse can be placed anywhere in the circuit it is advisable to install it on the negative lead as close to the battery as possible. Older NiCd and NiMH were prone to causing ‘black wire corrosion’ on the negative lead if left uncharged. Putting a non-metallic polyswitch in the negative feed rather than the positive will help to prevent any corrosion ‘running’ along the negative lead.

Even with locos which have protected batteries, I tend to use auto-reset fuses. I use the 1.6Amp rated fuse with the leads soldered directly to the contacts on the fuse.

Fuses need to be connected in circuitry terms as close to the battery as possible, to ensure the battery is properly protected.


A two way switch has three terminals, the centre terminal generally acts as the input, and the other two the output - one becoming 'live' when the switch is in one position and the other becoming 'live' when the switch is in the other position.

As can be seen from the wiring diagram at the start of this posting, the positive lead from the battery acts as the input and in one direction this links to the receiver/controller which in the other direction the switch links the battery to the charging socket.
Toggle switches such as that shown above are easier to mount as they require only a single circular hole for the switch to be mounted whereas a slide switch usually requires a rectangular hole and two smaller round holes for the screws to hold it in place.

If you want something less complex, then a couple of brass terminals can be discretely positioned on the outside of the loco body to which can be attached a couple of crocodile clips.
Battery chargers
A quick search on the internet or eBay for battery chargers will reveal a wide variety of models, ranging in price from under £10 to anywhere up to £200. If you are using only one type of battery, you could buy a dedicated charger to simplify the charging process. However, if you are intending it use various types of battery or various voltages, then it would be a wise investment to buy a decent 'intelligent' charger.Probably the charger most widely used by radio control modellers at present is the iMax B6.

Although it is often advertised as being for charging Lipo batteries it will also handle NiCd, NiMH, lead-acid and Li-ion batteries. Its major advantage is that it can be programmed for a wide range of battery types and voltage configurations and has an inbuilt memory enabling the user to store a series of set-ups for each loco. The unit also has settings for fast charging, discharging, conditioning and charging for long-term storage of batteries (eg over winter).
For more information on setting-up and using the iMax B6 charger see - A Quick Introduction to the iMax B6 charger
Balance charging
As mentioned above, it is important to ensure that all the cells in a lithium battery pack have the same level of charge, otherwise undue stress can be placed on one or more cells in the pack leading eventually to failure of individual cells. Alternatively, if the cells are out of balance with each other, a battery pack can appear to be fully charged when in fact only one of the cells has reached its maximum capacity.To keep a lithium battery pack healthy, it is advisable to balance-charge the pack from time to time. As indicated above, wiring-up a battery pack to include a balance-charge lead is very straightforward. As with the battery protection board (see above), the balance-charge lead needs to be connected to each end of the cells in a pack.


When balance charging a pack, the charger needs to be connected to the pack through the balance charge lead and some chargers will also need to be connected via the main charge lead. For more information on balance charging with the iMax B6 charger see - A quick guide to the iMax B6 charger.
Of course, if you use battery boxes and remove individual batteries for charging, then the charger will ensure that each cell has an equal charge.
Fuse or cut-out
It is possible to run battery locos without including a fuse, and several fellow modellers do so. However, having had experience of a NiMh battery pack being accidentally short-circuited (fortunately not when inside a loco) and seeing the amount of heat which was generated in a short space of time, I always include a cut-out to protect the battery packs from shorting-out. Furthermore, the constituents of li-ion batteries are quite volatile and are contained under pressure and so, if not handled carefully, can burst into flame - as has occurred on some high profile cases on aircraft.The simplest type of fuse is the glass fuse.

This type of fuse is a relatively cheap and effective way of protecting the batteries from short circuit. It will need a fuse holder and a stock of replacement fuses rated at the maximum tolerance of the motor. However, while this type of fuse is sufficient to protect batteries from direct short-circuits, it is less reliable for overload protection as it can be slow to respond, by which time damage may have been done. Furthermore, unless the fuse is located somewhere convenient, it can be a nuisance to replace when it blows.
Resettable circuit breakers, while more expensive, provide a more reliable and convenient method of protection. There is a range of different types but the most convenient for use in model locos is probably the Polyswitch which is a small electrical component which detects the current flow and if it exceeds that for Polyswitch is rated it will cut the supply until the overload is removed. Whilst the fuse can be placed anywhere in the circuit it is advisable to install it on the negative lead as close to the battery as possible. Older NiCd and NiMH were prone to causing ‘black wire corrosion’ on the negative lead if left uncharged. Putting a non-metallic polyswitch in the negative feed rather than the positive will help to prevent any corrosion ‘running’ along the negative lead.

Even with locos which have protected batteries, I tend to use auto-reset fuses. I use the 1.6Amp rated fuse with the leads soldered directly to the contacts on the fuse.
Fuses need to be connected in circuitry terms as close to the battery as possible, to ensure the battery is properly protected.

Switches
Your battery powered loco will need a switch of some sort to isolate the receiver and ESC from the battery, otherwise the battery will discharge while the loco is not being used. Any type of latching switch would be appropriate - as opposed to a momentary switch such as a bell-push. If, however, you want to include some sort of charging socket in the circuit to allow the batteries to be recharged without them having to be removed from the loco, then a two-way switch is a simple way of ensuring that the battery can only be recharged when the loco is switched off.A two way switch has three terminals, the centre terminal generally acts as the input, and the other two the output - one becoming 'live' when the switch is in one position and the other becoming 'live' when the switch is in the other position.

As can be seen from the wiring diagram at the start of this posting, the positive lead from the battery acts as the input and in one direction this links to the receiver/controller which in the other direction the switch links the battery to the charging socket.
Toggle switches such as that shown above are easier to mount as they require only a single circular hole for the switch to be mounted whereas a slide switch usually requires a rectangular hole and two smaller round holes for the screws to hold it in place.
Charge socket
Any two pole socket can be used for the charging connection but the accepted charge socket is a 2.1mm female power socket.
If you want something less complex, then a couple of brass terminals can be discretely positioned on the outside of the loco body to which can be attached a couple of crocodile clips.
 |
| Charge studs as used on the Sandstone & Termite Railway. Source: http://www.members.optusnet.com.au/satr/chargestuds.JPG |
The circuit presented previously shows how the socket and switch could be wired together with the battery and other components:
 However, whilst this will do the job it does not include a reverse function which means that the loco will have to be reversed by hand, have a manual reverse switch mounted on the model or you will have to buy or make a radio controlled reverse switch. For example, this is one based on a DPDT toggle switch developed by Greg Hunter (of the Sandstone and Termite Railway in Australia)
A plastic 'claw' or cam is fixed to the operating lever on a servo to flick the switch on receipt of a signal.
The version which I have developed is based on a DPDT (Double pole, double throw) slide switch.


The wiring on the switch has the +ve and -ve feed going to the centre two terminals on the switch and the feed to the motor is taken from one pair of the outside terminals. The other two terminals are then connected to the motor feed but swapped over, so that when the switch is flicked the other way the current is reversed.

This is how it looks in practice - red and black wires from the battery to the middle terminals, green wires attached to the two terminals at one end. Short red and black wires linking the two sets of end terminals but crossed over to reverse the current from the battery.

It is also possible to buy readymade radio controlled reversing switches, but they can be relatively expensive when compared with one made from a servo and a DPDT switch.

To save additional effort, it is possible to buy ESCs which include circuitry for reversing the motor and those which are specifically designed for the control of large-scale model locomotives. Whilst it is possible to use ESCs which are designed for use with model boats or model cars, their reverse functions are not always compatible with the needs of a locomotive. For example, some model car ESCs only allow reversing on half power. Furthermore, most loco specific ESCs include 'cruise' control rather than 'failsafe' mode. In failsafe mode, if the radio control signal is lost from the transmitter then the power is cut to the motor. Whilst this might be desirable for a model plane, car or boat (to prevent it from disappearing into the distance) it is less desirable for a model locomotive. Cruise control allows the loco to keep running if the signal is lost (for example if the signal is masked by building such as a shed or garage). Another advantage of cruise control is that once the loco has been set to run, the transmitter can be switched off to preserve its battery or to avoid having to keep the driver's thumb on the joystick.
Some of the better known railway specific ESCs include:

The Mtroniks Micro Loco has a 10 amp capacity and is only 26mm square. It has reverse and cruise control and is completely waterproof. It also has configurable braking which means that the loco can be programmed to decelerate slowly to a halt rather than stop abruptly.

 As
indicated above, developments have improved the reliability and
effectiveness of radio control technology. Earlier 'narrow band' radio
control systems were not only highly prone to interference, they
required the use of interchangeable crystals to change the frequency to
ensure that the signal from a transmitter was matched to the frequency
of the receiver enabling more than one model to operate at the same
time.
As
indicated above, developments have improved the reliability and
effectiveness of radio control technology. Earlier 'narrow band' radio
control systems were not only highly prone to interference, they
required the use of interchangeable crystals to change the frequency to
ensure that the signal from a transmitter was matched to the frequency
of the receiver enabling more than one model to operate at the same
time.


Steve Foster provides a range of transmitters and receivers, some of which interface with DCC decoders, to control battery powered locos. He also produces transmitters which are designed for use with live steam locos and so, if you are intending to run battery locos with live steamers, this could be a solution.
 Cliff Barker offers two types of control system - one using a small key-fob controller and the other using a small hand-held transmitter (shown here). The system is very simple and straightforward to install and avoids complications in trying to ensure the items are compatible with each other.
 The Timpdon Ultrarad system uses tailor-made components to control locos and accessories using the 433 MHz waveband. There are simple controllers and receivers for controlling one loco and also a switchable transmitter (shown here) which can control up to ten locomotives. There is also a transmitter specifically for controlling accessories such as point motors.
Deltang control systems offer a range of inexpensively priced transmitters, receivers and receiver/controllers. As with the Timpdon Ultrarad system (above), transmitters can be bought to operate a single loco or up to twelve individually coded locos from one transmitter. A particular feature of this system is the provision of a combined receiver and ESC on a single (very small) circuit board and also that their transmitters are available in kit form at a considerable saving in cost. Another feature of this system is that it uses 2.4gHz technology as standard. Readymade Deltang compatible transmitters are also available from RC Trains and from Micron
Tony Walsham (based in Australia) has been involved with garden railway radio control since the 1980s and has developed a range of RCS transmitters and receivers specifically designed to make the most of 2.4gHz technology. Some are based on Deltang technology and others are home-grown.
 The Locolinc system is very comprehensive and of track-powered or battery powered locos. The handset programmable addresses to provide specific control of individual locos or lineside accessories such as point motors and signals.
A relatively recent innovation has been the use of mobile phone (or tablet) technology to control garden trains. The advantage is that there is no need to buy a transmitter. The disadvantage which I have discovered is that it is sometimes difficult to see the screen in bright sunlight and there is no tactile sensation to enable you to check the position of the speed controls or accessory switches. However, it is a very cost effective way to control your locos. The leading supplier of this technology in the UK is Loco Remote.
With developments in mobile phone technology, Bluetooth as a control system has now become in reach of most people's budgets and technical capabilities. Free or low cost apps are now available which enable battery powered trains to be controlled from a mobile phone or tablet computer. Perhaps the most well known and successful id BlueRail which boasts an impressive range of features for two-way communication and multiple train control. Another advantage is that it can be used with DCC systems and so for someone converting their locos from DCC track power to battery power, it could be a useful half-way house.

Another difficulty was that the TCL makes a fair racket and my neighbour works late shifts, so I couldn't really use it until the afternoon, which was not often when I wanted to 'play trains'.
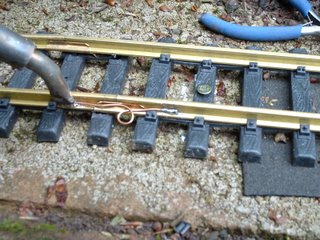 and also I had found, after time, that the electrical connections beneath pointwork deteriorated, which meant that jumper wires had to be soldered between rails to maintain electrical continuity (see How I improved electrical continuity of LGB pointwork). Similarly, loco wheels and skates needed to be cleaned periodically to ensure electrical pick-up was optimised. Loco wheels still need cleaning to remove accumulations of muck from the rails, but this is less frequent and less critical.

Electronic Speed Controllers (ESCs)
The cheapest way into radio control is to buy a basic ESC for under £10, such as this Turnigy 20A ESC for brushed motors. |
| Source: http://www.members.optusnet.com.au/satr/2point4GHz.htm |
A plastic 'claw' or cam is fixed to the operating lever on a servo to flick the switch on receipt of a signal.
 |
| Source: http://www.members.optusnet.com.au/satr/2point4GHz.htm |
The version which I have developed is based on a DPDT (Double pole, double throw) slide switch.


The wiring on the switch has the +ve and -ve feed going to the centre two terminals on the switch and the feed to the motor is taken from one pair of the outside terminals. The other two terminals are then connected to the motor feed but swapped over, so that when the switch is flicked the other way the current is reversed.
This is how it looks in practice - red and black wires from the battery to the middle terminals, green wires attached to the two terminals at one end. Short red and black wires linking the two sets of end terminals but crossed over to reverse the current from the battery.

It is also possible to buy readymade radio controlled reversing switches, but they can be relatively expensive when compared with one made from a servo and a DPDT switch.

To save additional effort, it is possible to buy ESCs which include circuitry for reversing the motor and those which are specifically designed for the control of large-scale model locomotives. Whilst it is possible to use ESCs which are designed for use with model boats or model cars, their reverse functions are not always compatible with the needs of a locomotive. For example, some model car ESCs only allow reversing on half power. Furthermore, most loco specific ESCs include 'cruise' control rather than 'failsafe' mode. In failsafe mode, if the radio control signal is lost from the transmitter then the power is cut to the motor. Whilst this might be desirable for a model plane, car or boat (to prevent it from disappearing into the distance) it is less desirable for a model locomotive. Cruise control allows the loco to keep running if the signal is lost (for example if the signal is masked by building such as a shed or garage). Another advantage of cruise control is that once the loco has been set to run, the transmitter can be switched off to preserve its battery or to avoid having to keep the driver's thumb on the joystick.
Some of the better known railway specific ESCs include:
Mtroniks Micro Viper

The Mtroniks Micro Loco has a 10 amp capacity and is only 26mm square. It has reverse and cruise control and is completely waterproof. It also has configurable braking which means that the loco can be programmed to decelerate slowly to a halt rather than stop abruptly.
Brian Jones Mac5

The Mac5 ESC provides reliable control of large scale locos with 'Autodrive' cruise control and automatic configuration when connected to a receiver.
Receivers and Transmitters
Whilst it is still possible to purchase transmitters and receivers using the older AM and FM technology - usually secondhand, it is more advisable to invest in 2.4gHz digital control technology.
2.4gHz technology

Radio
control systems using 2.4gHz technology avoid these drawbacks by
transmitting a coded signal across a broad bandwith. Once a transmitter
has been 'bound' to a receiver, the relationship is unique, thus
avoiding conflicting signals from other transmitters. Furthermore, the
system is virtually immune from interference from low frequency
emissions from motors and other electrical equipment, it requires less
power and hence batteries last longer and aerials need only be a few
centimetres in length.


The
cost of 2.4gHz equipment has fallen considerably as it has grown in
popularity. It's possible to buy brand new transmitter/receiver sets for
under £20 which are perfectly acceptable for use in garden railway
settings. Whilst it is possible to pick up older narrow band
transmitters and receivers, the cost and advantages of 2.4gHz technology
make investment in older technology a false economy.
Transmitter
It is possible to use standard transmitters designed for use with model aircraft or radio controlled cars to control garden railway trains.
These
can be bought quite inexpensively and will perform the job effectively.
However, with the majority of loco control systems, one of the
joysticks needs to be held in position to maintain the speed of the loco
(see Electronic Speed Controllers above). This is not the case,
however, with the RCS control system (see above) which has been specifically
designed to work with 2.4gHz radio control systems. This uses the
throttle joystick (which is generally not spring-loaded) for speed
control and the another joystick to change direction. The other four
joystick positions are then available for accessories such as lights and
sound (eg whistle).
Receivers
These can be bought relatively inexpensively ranging from those with 2 channels to up to 9 channels. For most railway specific ESCs, a three channel receiver is sufficient. However, if you want to add remotely controlled accessories, such as sound, lights, auto-uncoupling, then you may decide to opt for a receiver with more channels.
The most important consideration when buying a receiver is to ensure it is matched to the transmitter you are intending to use. There are two main systems used for 2.4gHz radio control and, of course, they are incompatible with each other. And within those two systems there are variations which mean that one branded system will not work satisfactorily with a competitor system. It is therefore advisable to stick with the same brand of receiver and transmitter to ensure compatibility.
For more information on the technology and relative merits of the main 2.4gHz systems see http://www.rcmodelreviews.com/spreadspectrum01.shtml
Railway specific radio control systems
In addition to the generalised radio control systems, there are suppliers who market complete tailor-made radio control systems specifically designed for use with garden railways. Some have been developed before the advent of 2.4gHz technology and have developed a loyal following.
Fosworks Omni
 |
| Source: https://fosworks.co.uk/omni-radio-1 |
Steve Foster provides a range of transmitters and receivers, some of which interface with DCC decoders, to control battery powered locos. He also produces transmitters which are designed for use with live steam locos and so, if you are intending to run battery locos with live steamers, this could be a solution.
Cliff Barker Speed Controllers
Timpdon Ultrarad system
 The Timpdon Ultrarad system uses tailor-made components to control locos and accessories using the 433 MHz waveband. There are simple controllers and receivers for controlling one loco and also a switchable transmitter (shown here) which can control up to ten locomotives. There is also a transmitter specifically for controlling accessories such as point motors.
The RC Trains / Deltang Radio control system

Deltang control systems offer a range of inexpensively priced transmitters, receivers and receiver/controllers. As with the Timpdon Ultrarad system (above), transmitters can be bought to operate a single loco or up to twelve individually coded locos from one transmitter. A particular feature of this system is the provision of a combined receiver and ESC on a single (very small) circuit board and also that their transmitters are available in kit form at a considerable saving in cost. Another feature of this system is that it uses 2.4gHz technology as standard. Readymade Deltang compatible transmitters are also available from RC Trains and from Micron
 |
| Source: www.gscalegraphics.net/ |
Railboss 4
Based in the USA, Del Tapparo has been involved in garden railway electronics for many years and has a wealth of knowledge and experience of developing radio control systems. His latest Railboss 4 is compact, simple to use and effective.Remote Control Systems (RCS)
 |
Source: http://www.rcs-rc.com
|
Tony Walsham (based in Australia) has been involved with garden railway radio control since the 1980s and has developed a range of RCS transmitters and receivers specifically designed to make the most of 2.4gHz technology. Some are based on Deltang technology and others are home-grown.
Locolinc control system
Wireless control from a phone or tablet computer
 |
| Source: http://www.locoremote.co.uk/ |
Bluetooth
 |
| Source: https://bluerailtrains.com/blueraildcc/userguide/ |
With developments in mobile phone technology, Bluetooth as a control system has now become in reach of most people's budgets and technical capabilities. Free or low cost apps are now available which enable battery powered trains to be controlled from a mobile phone or tablet computer. Perhaps the most well known and successful id BlueRail which boasts an impressive range of features for two-way communication and multiple train control. Another advantage is that it can be used with DCC systems and so for someone converting their locos from DCC track power to battery power, it could be a useful half-way house.
I have been experimenting with a more cost effective approach to making use of Bluetooth technology. For an outlay of less than £20 (or half that if you buy directly from China), plus a little technical know-how, it's possible to set-up your own system using Arduino components - see Controlling a loco with Arduino and a free mobile phone app. There does seem to be some potential in using this form of technology. The drawbacks for me are lack of tactile feedback (ie there's no knob, joystick, button or switch) and difficulty in seeing the screen in direct sunlight. However, a more expensive phone or tablet might help with the latter.
The advantages of battery power over track power
My perspective
Track cleaning
The main reason I decided to change from track power (DCC) to battery power in the garden was to overcome the chore of track cleaning (see How I clean the track). Although my railway is not the most extensive, a fair proportion is situated under trees and bushes and so cleaning the tracks before running sessions was taking between an hour and an hour and a half. I did have an LGB track cleaning loco (TCL), but I tended to use this only to brush-up the cleaning once in a while.
Another difficulty was that the TCL makes a fair racket and my neighbour works late shifts, so I couldn't really use it until the afternoon, which was not often when I wanted to 'play trains'.
Maintaining electrical continuity
Another advantage is maintenance. Keeping electrical continuity to all parts of the system means that the connections between lengths of track have to be checked regularly (see How I bonded the rails)
Relative cost
Another consideration was cost. After using ordinary analogue DC control for a couple of years, I bit the bullet and opted for DCC (Digital Command Control) (see Going digital). The main reason was to keep the wiring simple. To isolate passing loops in DC, allowing two locos to pass each other, was quite a complicated affair; whilst in DCC it was extremely straightforward. DCC equipment is quite expensive - it requires a 5 amp transformer, a Central Station control centre and at least one handheld controller (approx £450). In addition, each loco has to be equipped with a decoder costing at least £60. With radio control, outlay is needed for the transmitter(s) (£30-£70) and each loco needs a receiver, a controller and a set of batteries (£40-£100), overall this tends to be less costly than DCC, particularly as the price of radio control equipment has fallen steadily over recent years as has the cost of high capacity rechargeable batteries. However, it has been argued that DCC systems become more cost effective if you are considering having several locos running on your railway. I have calculated that the break-even point for battery/radio control is around 20 locos, though others have argued it is around 4 locos. A lot does depend on whether you construct your own battery locos rather than buying off the shelf models and whether you want to have wireless DCC control.Portability
Another great advantage is flexibility. It's possible to take a radio-controlled loco on a visit to virtually any other garden railway of the same gauge and run it straight away. A battery-powered loco will happily run alongside live steamers and, if the wheels are insulated, can run alongside track-powered locos.Disadvantages of battery power
Availability of models
A major disadvantage of battery power is the lack of availability of ready to run models which are battery powered and radio controlled. Whereas there are dozens, if not hundreds of ready to run track powered or live steam locos, there are relatively few battery powered models. You will probably end-up either converting track powered locos, constructing kits or building your own models from scratch.
Installing batteries
The main disadvantage is the need to find space in each loco for the batteries and control equipment. Whilst it is possible to equip small locos with radio control, it can restrict the size of batteries which can be installed and hence the running time. However, more recent developments in lithium-ion and lithium-poly technology has greatly improved this limitation.Technical know-how
Some suggest that a greater understanding of things technological is needed for radio control, but I would argue that it is no more complicated than DCC or even analogue control once the basic principles have been understood.Reliability
At one time, radio control systems suffered from interference (eg from foliage or from metal objects including the track and the loco chassis). With the advent of 2.4gHz technology, such issues have virtually disappeared - though sometimes the signal can be compromised by interference from such things as wifi and wireless doorbells - though I have never found this to be a problem.Conclusion
Overall, having tried various methods of power and control, I have reached the conclusion that battery power and radio control are the way forward for me. As I dodder towards old age I need something which requires the least maintenance and provides the greatest flexibility. It has also encouraged me to construct my own locomotives and not only experiment with various radio control systems, it has also provided me with an opportunity to add sound to my locos (see Progress Report 49). Any reservations I previously had over battery power and radio control have now been dispersed. I am looking forward to then next summer season when I will conduct operating sessions entirely run by battery power. Come to think of it, if there are any decent spells of weather during the winter, I might now be more tempted to have an impromptu operating session without the need for extensive track cleaning and electrical maintenance!
17 comments:
Discovered your brilliant research during a 2week stay in Dumfries infirmary.I learned so much from Your highly informative article that I was able to purchase an aristocraft diesel on ebay , bits and pieces from Peter Spoerer and Deltang and now have a radio control loco running on my 5 meter Cliff Barker test track. This fun project has helped keep me sane through the misery of chemotherapy. Thanks.
Dawson@ sellardesign .co.uk
Thanks for that message. It is very heartwarming to find that my musings have been put to such good use. All the best with your treatment and recovery and also with developments with your railway.
Rik
I know you from GSC but all the same this a great read. I have come to the same conclusions in paralell to you. Fantastic website.
Very kind of you, thanks. It's reassuring to know others are of a similar mindset. I always try to acknowledge there are plenty of other ways of solving problems in this fascinating hobby of ours and there are far more accomplished modellers out there than me. What I try to do on my blog is share a few ideas with others to hopefully help them short-cut the learning process or give them a kick-start into some aspect of modelling with which they are unfamiliar.
Fantastic and informative write-up. Have now got my list of components and where to find them ready for my first investigation into battery power. A lot of confidence gained from this blog.
Thanks for the feedback Ricky. I hope all goes well - but if you run into any difficulties drop me a line. Only too happy to help if I can.
Rik
A very interesting and informative article, thanks. I am myself dipping an exploratory toe in the pool of battery powered garden railway operation, although my 'toys' will be manually controlled using switches rather than remotely by radio. Do you have any experience in this area?
Hi Seb
Not sure what's going on with the comments system on Blogger at the moment. Looks like you posted this at the beginning of January but it's only just shown up. Anyway, to answer your question .....
I've had only limited experience of manual control - the IP Lollypop railcar kit came with a manual speed controller and the 32mm gauge HLW loco was bought secondhand with very basic manual control (ie just an on/off reversing switch). If you look on the IP Engineering and the Cambrian websites, they sell the gear needed for manual control.
Hope that helps
Rik
PS - Once you've equipped a loco for manual, it's only a quick step to add a Deltang receiver/controller
Hi Rik, love your blog, it's been very informative!
I'm looking at battery power and r/c, and I'm wondering -
is there any reason I can't power a small g-scale loco with a pp3 9-v battery?
- Terry
Hi Terry
Theoretically it is possible, but in practice it's not generally satisfactory. PP3s don't have the guts necessary to provide the amps needed to power a motor other than for, say, a light plateway trolley.
Rik
Hi Rik. Great article and certainly food for thought! My question is - if you have track power available, say 24V DC, could you use it to continuously charge the batteries thereby having the best of both worlds - prolonged operation and protection against poor connectivity? Steve
Hi Steve
In theory, yes. I've not yet come across anyone who has achieved it satisfactorily, but that's not to say it couldn't be done. I wouldn't recommend doing it with li-ion batteries though. They are very sensitive to the charge current they receive and you could run into difficulties with the peaks and troughs which the track supply would provide as the loco traversed the track.
Rik
Hi Rik, I like your information on converting to battery power. I have a scratch built diesel rail car that I have put in a RC from a second hand small car @ cost of £1.00. This works quite well on a motor for each bogie but the batteries do not last long, and I did not transfer the charger with it so I have to take time charging up 8 AA batteries in two lots. I am now looking at converting a large German style diesel loco 20v which is track powered to battery but I am still not certain how much battery power I will need.
Hi Anon
The majority of my locos use G scale motor blocks a mechanisms which are supposedly 24v. I run them all on 12v battery packs (all mine are now li-ion). My mate in Oz (Greg Hunter - Sandstone & Termite Railway) runs most of his G scale motor blocked locos on 9.6v (ie 8 x NiMh cells). We both get around 3-4 hours running time between charges - which I find is about right for a day's running. I usually have 4 locos out for a running session and so even when I run for 10 hours, none of them is actually running for more then 3 hours each.
Rik
I have already used a lot of info from your site when fitting a sound card to one of my locos and came across this while looking for an RC speed controller. I have been uable to source one that operates with a seperate motor supply, they all provide to high an output for small motors when using a supply that suits there operating range. I need to use the 4.8v RC supply and signal to operate the ESC but I need it to accept and control a seperate 3 volt supply for the motor. I have sourced a unit that will provide the 3volt regulated supply from the 4.8 volt RC battery but not a suitable ESC.
Dear Rik,
I am thinking of modifiying my LGB locomotives to Battery and RC controlling.
Did you find a solution to an automatic stop at a station? I saw that the Deltang RX605b may provide this, but the receiver is no longer available.
Best regards
Markus
Hi Markus
Yes, you're right. I've programmed both Deltang Rx60 and Rx65 for auto station stop but the MR603 which Andy at Micron has developed to replace it doesn't include auto stop (as yet).
If you can find a Deltang Rx here's my tutorial - https://riksrailway.blogspot.com/2018/02/how-i-programmed-deltang-rx65b-for-auto.html
.... Otherwise you may have to resort to Picaxe or Arduino or you could wire in one of these - https://www.ebay.co.uk/itm/192336588885
Rik
Post a Comment